Hours transfer rules
What is Hours transfer?
It’s a feature that enables you to move hours by means of an adjustment overlay from one department to one or more departments at a hotel.
What is its purpose?
It allows you to be more precise, so you have a clearer picture of the reality on department level at your hotel. Its a great tool to use if you have staff working in various departments, as you can track and understand where the resources are used for the entire shift. It also allows you to fairly compare revenue per worked hour (RevPolu) between departments.
- The direct RevPolu may vary from the total RevPolu.
- The transfer hours are not reflected in your ERP or accounting system.
- You see the transfer hours in the cockpits, (sender and receivers).
- You can create rules for all departments at your hotel.
- If your staff uses the Time Keeping System (TKS) correctly, i.e. they sign in and out of the correct departments using the correct department codes then you don’t need this feature to adjust hours in PMI.
- Although you can execute the rule as often as you like, it is recommended that the execution is done at the month-end to save time while getting the month-end productivity, incl. RevPolu adjusted.
- Note that this feature only transfers actual hours, not forecast and budgeted hours.
- Every time you execute a transfer and/or make an adjustment, PMI automatically reverses prior transfer entries in the same month, recalculates month-to-date, and reposts the adjustment entry.
Intended users and requirements
Controller, General Manager at property level and HQ Administrator or higher. The feature is activated in Hierarchy. Contact support@d2o.com to activate.
Tutorial videos:
When can this rule be used? Below are a couple of examples
Example 1: Moonshine vs. Banquet
- You’re an F&B manager responsible for both restaurant Moonshine and Banquet.
- Let’s say the direct RevPolu for Moonshine and M&E are €58 and €66 respectively without considering the effort laid down by the kitchen staff.
- The chef informs you that the team lays down significant more effort when preparing food for Banquet than Moonshine.
So, if we consider the total RevPolu, i.e. the total effort, including kitchen, Moonshine will appear more attractive.
The hours incurred are as follows for a month:
Direct hours are those incurred by the staff in that department while transferred hours are those hours incurred by the Kitchen team when working on preparing food the receiving departments. In this example, Moonshine and Banquet.
Let’s assume of the 960 hours incurred in the kitchen, 200 and 600 (*) are attributable to food preparation for Moonshine and Banquet respectively.
Considering the total hours required – i.e. directly and indirectly incurred – to prepare the F&B product, we see that Moonshine in fact has a more attractive total RevPolu. In other words, Moonshine generates more revenue per worked hours than Banquet.
Example 2: Its 08:15 and your lobby is filled with 50 pax. Their tour bus has broken down. They need 25 day use rooms from 09:00 – 14:00, breakfast and luggage service on arrival and departure. You don’t have this reservation in your system as it’s a *walk in*. You don’t have the capacity either in Breakfast or in Front Office. However, you managed to get assistance from Housekeeping and Administration to assist with Breakfast. You are able to get Maintenance to assist with the luggage pull. When the tour group has departed, and you have thanked your team for making yet another memorable moment for the guests, you want to record this unplanned work so that it reflects a fair productivity level. You create the transfer rules in PMI and execute the transfer of hours so that the unplanned event is reflected fairly by departments in PMI (of course, assuming the staff involved have not/cannot record their hours to reflect this unplanned event in the timekeeping system (TKS).
Instructions
For learning purposes we have divided it into 2 sections, Create & maintain transfer rules and Execution of transfer rules.
Section 1: Create & maintain transfer rules
- Access and maintain transfer rules
- Create a transfer rule based on:
Fixed percentage
Fixed amount
Food revenue
Log on with your credentials. From the Main menu click on Advanced Settings and activate Hours transfer.
How to create a transfer rule
Example 1: Fixed percentage – this rule splits a % from sender to receivers
- Add a new transfer.
- The name of the rule can be sender.
- Description can be receivers.
- Choose your valid from date. Be specific and click on date to activate. The transfer rule cannot be used outside this date range; however, the date can be edited later.
- Choose your valid to date.
- By choosing the relevant transfer rule, Fixed percentage, you determine the principle by which hours from sender is distributed to receivers.
- A sender cockpit can only be a sender in one rule at a time. You cannot have the same sender in two rules for the same period.
- % to transfer, here you can put in the % you would like split. Transfer leftover, this is chosen when you want a fixed amount to remain with the sender.
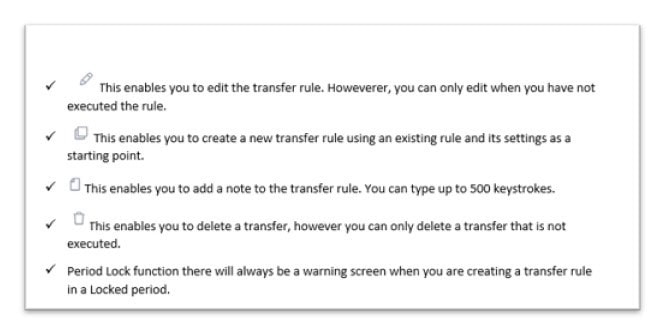
- Choose your Receiver cockpit(s). If you add one too many receivers, you are also able to remove it quite effortlessly with the trash cans.
- Fill in your Fixed %. Remember that it must add up to 100% of the % to transfer.
- Hit Save, your transfer rule is saved.
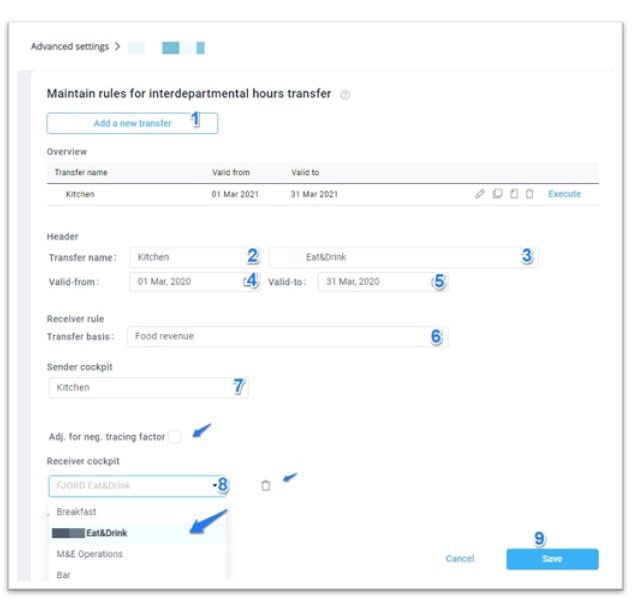
Example 2: Food revenue
This rule splits a % from sender to receivers – the total hours on sender will be prorated based on the respective food revenues of the receivers as calculation of the number of hours to transfer from sender to receivers.
- Add a new transfer.
- The name of the rule can be sender.
- Description can be receivers.
- Choose your valid from date. Be specific and click on date to activate. The transfer rule cannot be used outside this date range; however, the date can be edited later.
- Choose your valid to date.
- By choosing the relevant transfer rule, Food revenue, you determine the principle by which hours from sender is distributed to receivers.
- A sender cockpit can only be a sender in one rule at a time. You cannot have the same sender in two rules for the same period. Kitchen is often set to use Total Food revenue and the only sender in this rule.
- Choose your Receiver cockpit(s). If you add one too many receivers, you are also able to remove it quite effortlessly with the trash cans. Only cockpits which have food revenue configured in the Hierarchy can be assigned as Receivers.
- Hit Save, your transfer rule is saved.
- Adj. for neg. tracing factor, this option is only activated when Food revenue is chosen. More details in the Terms and icons used section below.
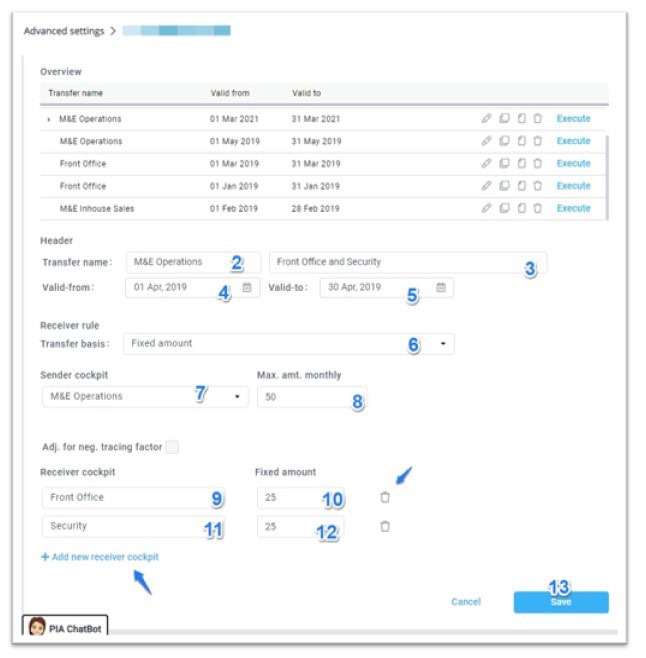
Example 3: Fixed amount
Fixed amounts distributes a maximum monthly amount from sender to receivers.
- Add a new transfer.
- The name of the rule can be sender.
- Description can be receivers.
- Choose your valid from date. Be specific and click on date to activate. The transfer rule cannot be used outside this date range; however, the date can be edited later.
- Choose your valid to date.
- By choosing the relevant transfer rule, Fixed amount, you determine the principle by which hours from sender is distributed to receivers.
- A sender cockpit can only be a sender in one rule at a time. You cannot have the same sender in two rules in the same period.
- Max. Amt.mthly, you select how many total hours for the month you want to transfer, if more hours selected than existing in the sender cockpit then all hours will be transferred.
- Choose your Receiver cockpit.
- Fill in your Fixed amount, and go to step 13 if you have only one receiver cockpit or
- You can add several receivers. If you add one too many receivers, you are also able to remove it quite effortlessly with the trash cans.
- Fill in your Fixed amount. You get an alert if the receiver cockpits do not match the maximum monthly amount.
- Hit Save, your transfer rule is saved.
Section 2: Execution of transfer rules
- Execute transfer rules.
- Understand the following:
- Output report
- Sender/Receiver cockpits
- Management Perspective
- Benchmarking
- Terms and icons used in this module
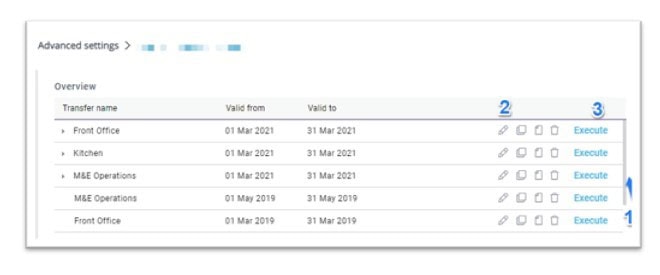
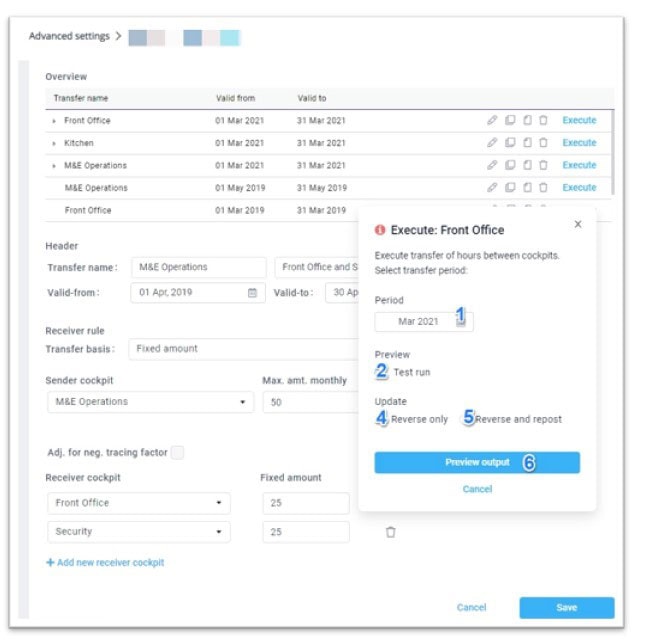
- First things first, the overview list is in descending order. Scroll to the top of the list to find the last created transfer rule.
- Here you can Edit as its your last opportunity to change any part of the rule or
- Click on Execute
- Next Validate the period. It cannot be outside the date range you defined earlier. Click on calendar and choose the month. If you created a rule over several months then you need to verify each month.
- Test run, here you see the calculation for validation, at this stage nothing is updated in sender and receiver cockpits. We recommend you always test run and validate the simulated result before choosing any of the other two options.
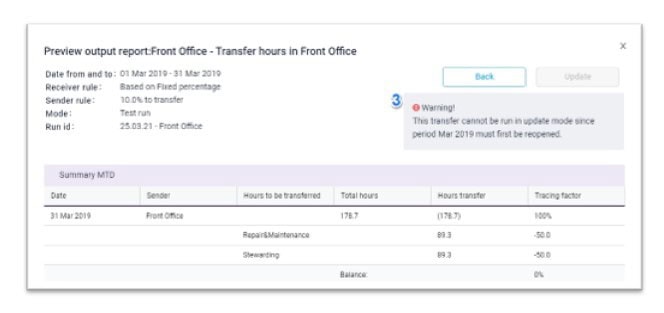
3. At this stage, a warning can appear if the transfer rule overlaps in a month that is closed. This is what we refer to as Period Lock. More on this in the Terms and icons section below.
4. Reverse only, you can reset the previous rule, not repost. Useful when the same rule is run but you want to reset any transfer done for that specific month
5. Reverse and repost, it calculates, resets all prior postings, and reposts using maximum hours for month to date. We set the rule for one month and as we have daily data including corrections to previous days, we make the postings on Day 1 using information available. On Day 2 we reverse that and look at new MTD total and make a new posting for the sum of values now in Day 1 and Day 2. The same process Is repeated every day for MTD. This means that each day of the month will show some transfer hours and any changes to the month are picked up on the day.
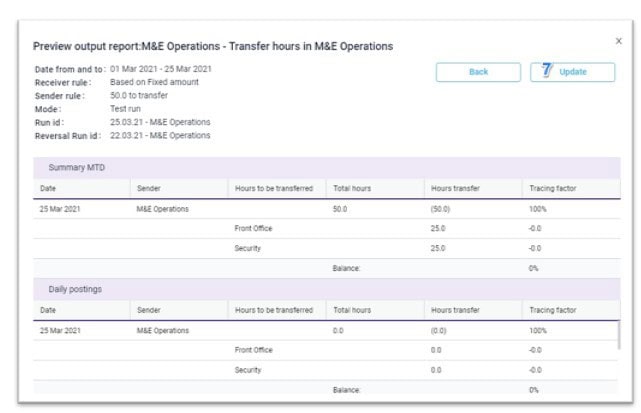
6. Hit Preview output. Are all your details in order? You are able to move the report across the screen so you are able to check the overview / transfer rule.
7. Hit Update. Your transfer is now visible in sender and receiver cockpits.
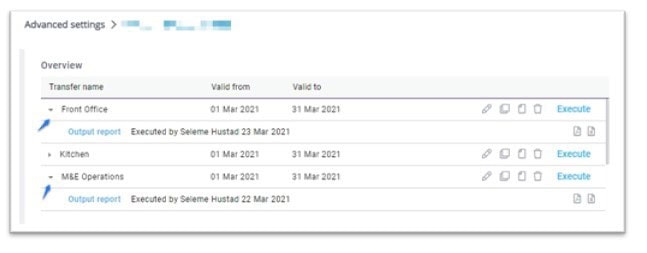
- Return to overview. Here you can extend an existing rule as you are able to edit the Transfer name, Description and Valid to date.
- To the left of the rule, you have an expand arrow, here you find the output report. More information in the Terms and icons section below.
- You can download the output report in .pdf or .xls
Sender and Receiver cockpits
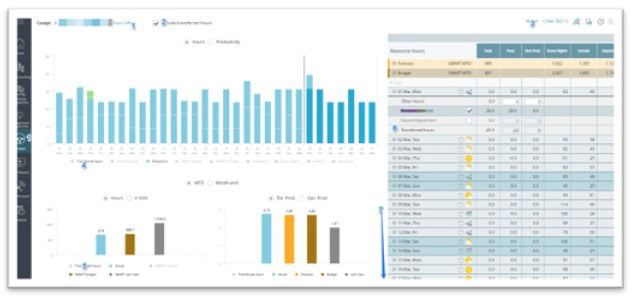
- Go to sender cockpit, the example from Step 1 is Front Office.
- Activate Include transferred hours.
- Check that the period is correct.
- Activate Transferred hours below the graph you see the negative hours displayed when you hover over it. Productivity levels increases in sender cockpits.
- Activate Transferred hours below the wallet you see the negative hours displayed when you hover over it.
- Then Resource Hours on the right-hand side you see the day-to-day breakdown of negative hours and
- Below you see the MTD full amount.
- The same logic applies when you check receiver cockpits, the only difference is the hours displayed are positive and the productivity levels decreases in receiver cockpits.
Management Perspective
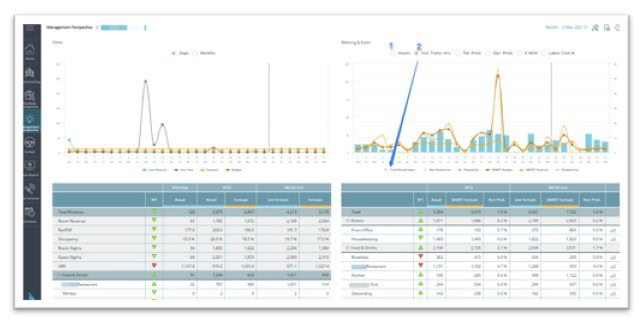
- Go into Management Perspective and choose between Hours.
- and Incl. Trans Hrs.to get a bird’s eye view of all internal transfers in the various outlets.
Benchmarking
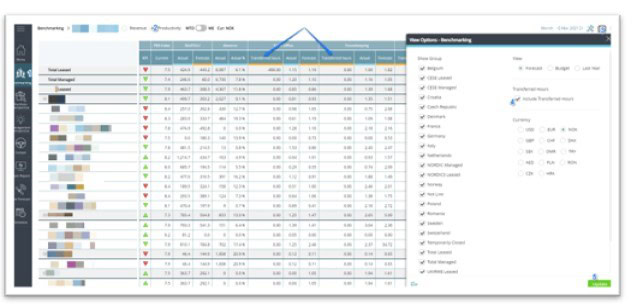
- For those users with Benchmarking.
- Activate Productivity.
- Open up View Options.
- Activate Include Transferred Hours.
- Update.
- Here you find an overview of all internal transfers in all departments in all hotels across your portfolio.
Output report
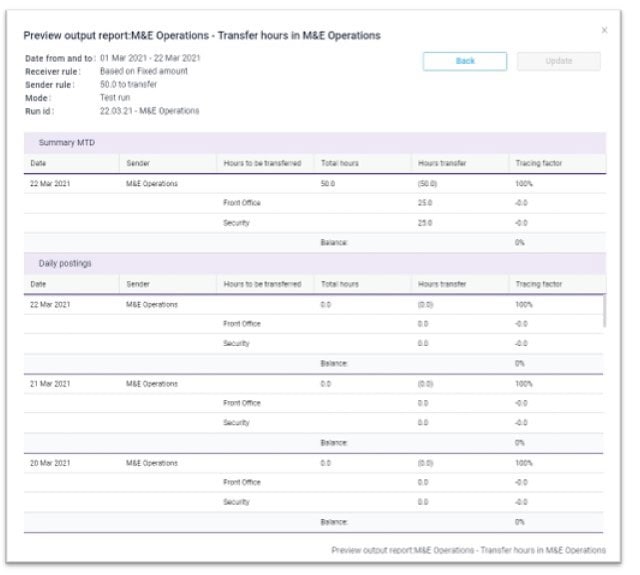
The output report, this gives a breakdown of the transfer rule you created. Summary MTD displays sender and receiver cockpits and hours transfer. Daily posting displays the daily breakdown. It can be downloaded in .pdf or .xls
Terms and icons used in this module
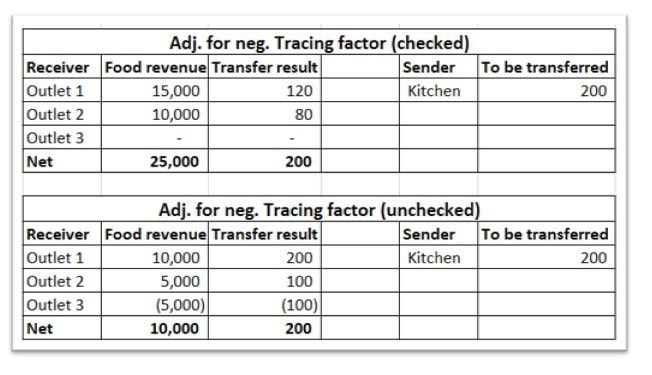
Adj. For neg. Tracing factor
- This option is only checked when Food revenue is chosen.
When activated:
Receivers with negative tracing factor (food revenue) will not attract any hours, and
The absolute value of negative factor(s) will be added to receivers with positive tracing factors. E.g.
starting point: Kitchen: 200 hours to transfer to receivers Outlet A 10k, Outlet B 5k and Outlet -5k
Result: Outlet A 120 hrs (200*15k/25k), Outlet B 80 hrs (200*10k/25k) and Outlet 0.
When deactivated:
Receivers with negative tracing factor (food revenue) will attract negative hours:
Starting point: Same as above
Result: Outlet A 200 hrs (200*10k/10k), Outlet B 100 hrs (200*5k/10k) and Outlet -100 hrs (200*-5k/10k).
Max. Amt.mthly This enables you to select how many total hours for the month you want to transfer, if more hours selected than existing in the sender cockpit then all hours will be transferred. For example, if you write 700 hours in this box and there is only 500 hours in the cockpit then only 500 hours will be transferred. The logic of the daily transfer is – the receiving cockpit cost driver is split daily and used as the base of the transfer for the hours.
More about Food revenue transfer rule
This option is only available if you choose Kitchen in sender cockpit (where food revenue has been configured in the hierarchy).
The calculation will be based on the food revenue. i.e.:
A kitchen is often set to use “Total food revenue”
The receiving cockpits belong to profit centre’s which have food revenue configured in the hierarchy.
Example: If Meeting & Events food revenue is 30% out of the total food revenue for a selected period in the execute popup then 30% of the hours should be transferred to the receiving cockpit
The drop-down list for receiver cockpit displays only profit centres where food revenue is activated (in settings of live forecast).
If a property has several kitchens the cost driver if often set to Food cost from selected profit centres instead of “Total Food Revenue”. The logic should then be that you can only choose receiver cockpits that are setup as cost driver in that selected kitchen. I.e., the drop-down list in receiver cockpit only display the corresponding profit centre.
Should the receiver cockpit only be for part of Total Food Revenue then the remaining hours will stay in Sender cockpit (kitchen).

